The Ultimate Guide to Home Network Setup

The internet has become such an integral part of the average person’s life—so much so that it’s hard to think back to what life was like without wireless internet connections available virtually everywhere we go. WiFi technology has made it possible for us to connect to the world wide web without any physical wiring needed—even within the comfort of your own home.
If you already have high-speed internet service in your home, creating your own home wireless network is fairly straightforward. Home wireless networks allow you to connect multiple web-enabled devices, such as PCs, smartphones, printers, and tablets, and foster an open line of communication between these common household gadgets. Not only can your favorite devices connect to the web, but they can also connect with each other to foster a streamlined home WiFi network.
While there are many complex facets within the internet realm, creating your own home network is one of the easier tasks you can do yourself. Using this comprehensive guide, we’ll walk you through everything you need to know about setting up a wireless home network.
What are the benefits of setting up a home network?
How to set up a WiFi home network: Step by step
Wireless home network setup FAQs
What is a home network?
A home network is a group of web-enabled devices that connect to the internet and communicate with each other. There are two primary types of home networks; wired and wireless.
- A wired network connects devices via physical cable wiring.
- A wireless network connects devices without any cables.
During the early years of the internet, wired connections were most common. However, as wireless technology advanced and became more household-friendly, the vast majority of internet consumers opt for a wireless connection over outdated and somewhat limited wired home networks.
Additionally, for many families today, one computer is no longer enough and no longer convenient. Most modern households are home to multiple web-enabled devices like smartphones, tablets, smart TVs, e-readers—all of which depend on a strong wireless internet connection to operate.
What are the benefits of setting up a home network?
Setting up a home network makes it possible for computers and devices to communicate with each other via a shared internet connection. When it comes to enjoying wireless connectivity within your own home, building a home network serves as the foundation. Below, we’ve outlined some of the most attractive benefits of setting up a home network.
Internet connection sharing: Rather than paying for multiple ISP accounts to furnish your household devices with a direct internet connection or data plan, setting up a home network makes it possible to access the web across several devices via one simple internet connection.
Do note that your internet connection could slow down if there are too many devices on it. Many ISPs, however, make it easy to purchase service plans that accommodate however many devices you intend to connect.
File sharing: Network file sharing between computers provides more flexibility than using portable disk drives. Not only are you able to share images, audio, and text documents, but you can save backups of essential data on another device. Backups are one of the most essential yet overlooked perks of home networking.
Printer sharing: Wireless printing becomes a simple task when you have a home network in place. No need to run from one device to the other to ensure your print job is successfully delivered—just a few clicks on any of your web-enabled devices can result in a perfect print from anywhere in the house.
Smart device connectivity: Smart gadgets such as thermostats, light fixtures, surveillance systems, kitchen appliances, smoke alarms, TVs, and many more are among the latest additions to the world of WiFi. Each of these smart devices are able to communicate with each other by using a single home network that together forms an Internet of Things (IoT) network.
Home entertainment: If you’re interested in joining the ranks of cable-cutters swapping out their traditional cable subscription for a more affordable streaming media service, setting up a home network allows you to watch all of your favorite flicks from anywhere in your home.
Telephone service: Forget copper wires and landline phones—with a wireless home network, you can make phone calls using an internet-connected smartphone, tablet, or computer using voice over IP (VoIP).
How to set up a WiFi home network
Determine what you want
Before jumping into a home network buildout project, it’s important to first establish what purpose you want your home network to serve. To begin weighing your options, start by asking yourself the following questions:
- Do you require access to a corporate network via a virtual private network (VPN)? If you work remotely from home, you’ll need a high-grade router that can handle VPN passthrough.
- Are you a frequent online gamer? Do you play multiplayer online games through services like PlayStation Network or Xbox Live? If so, you’ll need a good router steeped in essential configuration capabilities such as port forwarding and quality of service (QoS).
- Will you have more than ten devices connected to your WiFi home network? In order to ensure each device can perform at its peak, you’ll need a dual or tri-band router.
By answering these questions, you can better ensure that the network you build is perfectly suited to accommodate your web-connectivity needs.
Gather what you need
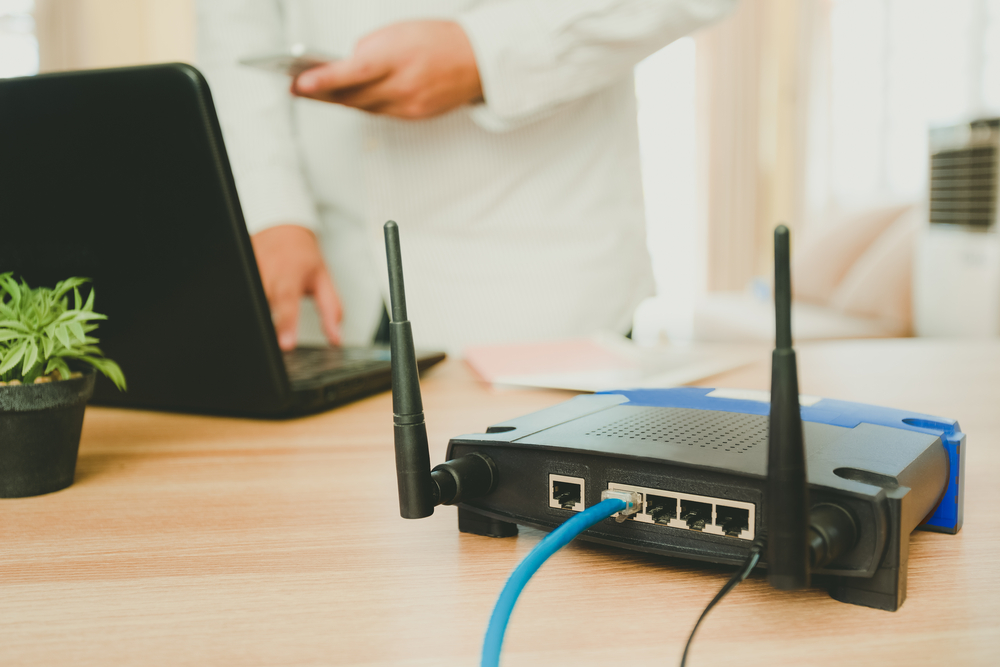
Building a wireless home network is a mere matter of arranging and configuring all of the necessary hardware infrastructure. You will need the following four devices to set up your home network:
- A wireless router – This device is responsible for transmitting and broadcasting the WiFi signal from your modem to your web-enabled devices.
Your internet service provider may offer a wireless router for a small monthly fee, and if you’re unsure of what to look for when purchasing a wireless router, this may be your easiest option. Should you decide to shop for your own router, be sure to do plenty of research before settling on one. - A modem – There are three types of modems: cable, digital subscriber line (DSL) and dial-up. Connected to in-ground coaxial cables, modems act as digital translators that convert signals from your provider lines into signals your router can understand—in simpler terms, modems bring internet into your home.
- An ethernet cable – This cable is necessary to foster a physical connection between the router and the modem. This cable is usually included with your modem.
- A computer or laptop with wireless capabilities – In order to configure your router and establish security settings, you’ll need a web-enabled PC to complete your setup.
5 steps to set up your home network
Once you’ve gathered all of the necessary equipment and components to create your wireless home network, follow these instructions to set up and configure the router, and connect your devices to the network.
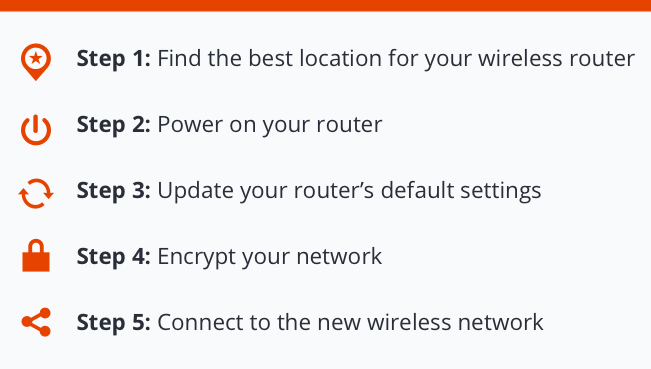
Step 1: Find the best location for your wireless router
Did you know that the placement of your WiFi router has a significant impact on the strength of your wireless signal throughout your home? Your WiFi router should be positioned on an elevated surface with clear space and limited obstructions.
Since WiFi signals travel perpendicularly to your router, it is necessary to ensure that your router is not situated somewhere on the floor. Doing so will only restrict the signal’s reach. Try to avoid installing the router too close to obstructive materials such as concrete, brick, or cement, because these thick materials can often impede signal quality.
The best place to position a WiFi router is somewhere central inside of your home. Whether that’s a hallway console table, a living room bookshelf, or an island countertop, the location of your choice should be away from walls and on an elevated surface. If you’re trying to figure out a few sensible alternative locations to put your router, check out the tips below for some practical advice.
Best places to put your internet router:
- On a fireplace mantle in a central living room or den
- On a coffee table located in a central hallway or living space
- On a second-floor landing
Worst places to put your internet router:
- In a kitchen near other appliances that can emit waves that might interfere with your signal
- In a corner of your house surrounded by walls
- On a windowsill where the signal can travel outside
- In a basement or attic
Step 2: Power on your router
Before booting up your router for configuration, be sure to first turn off your modem.
Next, you’ll need to connect your router to your modem by attaching the two via an ethernet cable. As mentioned before, this cable is typically included with your modem or router.
Power on your modem, then plug your router into an AC power socket and wait at least 30 to 60 seconds for the lights on your router to illuminate. Once all lights are on, press the power button on your router to turn it on.
Step 3: Update your router’s default settings
Next, you’ll need to use your computer to set up your router’s default settings. Using your web browser, enter the router’s default IP address into the address bar to navigate to your router’s sign-in page. Your router’s instruction manual should include this information.
Once the router’s sign-in page appears, enter the exact sign-in details provided to you within your router’s instruction manual. When you have successfully logged in, your router’s settings page will appear. Locate and select the Network Name setting, then enter a unique network name, or Service Set Identifier (SSID). This name simply serves as an easy way to distinguish your network from neighboring connections.
Step 4: Encrypt your network
Setting up your wireless security is an absolutely essential step in protecting your connection and data. Locate the Wireless Security setting, and choose an encryption option. While there are several types of encryption you can use, we recommend opting for WPA2, as it is generally considered to be the most secure.
Enter and save your desired password. Be sure to choose a password that is at least 8 characters and includes numbers, letters, uppercase, and lowercase. Ultimately, the more complex your password is, the more secure your connection will be.
Step 5: Connect to the new wireless network
After encrypting your network, your wireless home network will become discoverable to other devices in your home. Access and join the network by accessing WiFi settings on each individual device and entering the password. Voila! Internet-access and home network creation in five easy steps.
Wireless home network setup FAQs
Can computers on the network run different operating systems?
Yes, regardless of your devices’ operating systems, all can connect to the same home network and coexist in harmony. For example, in the case that you have an Android smartphone, a Mac OS laptop, a Windows tablet, and a Linux desktop, you won’t have to worry about the systems creating any incompatibility issues while occupying and utilizing your network.
What should I consider when shopping for a wireless router?
- Lifespan: Although you’ll be hard-pressed to find a manufacturer that puts an operational expectancy rate on their router, searching for reviews will reveal all you need to know about a particular router’s lifespan. Like many other high-use electronics, routers deteriorate with time and should be replaced every three to four years.
- Price: The cost of routers can range anywhere between as little as $15 to as costly as $400. Generally speaking, the most expensive the model, the more impressive the performance—however, it’s key to consider the parameters of your budget first when pinpointing the best wireless router for your residence. For the average household, a router within the $100-$200 range will suffice.
- Number of frequency bands: You will need to decide between purchasing a single-band, dual-band, or tri-band router when shopping for a wireless router. If you don’t need lightning-fast speeds and you don’t have any nearby neighbors that might interfere with your home network, odds are likely that a single-band router will satisfy your needs.
- Range: As mentioned before, the position of your router is a crucial factor to consider when optimizing your WiFi signal strength. When shopping for a wireless router, be on the lookout for routers that offer a more expansive range that can extend your network’s reach to hard-to-reach places on your property.
- Smart capacity: Not only are routers becoming more powerful, they’re also becoming more intelligent. Smart WiFi routers are engineered to provide seamless interaction and constant communication with mobile applications and network-connected devices. These futuristic smart-home gadgets effectively enhance your WiFi experience through automation.
How do I create a strong WPA2 password?
Creating a strong password is likely much simpler than you may initially think. Use the following tips to create an impenetrable WPA2 password to keep your home network safe and secure.
- Stay away from obvious passphrases: Don’t use Password123, or abc123, or qwerty1234 as your password—these are incredibly easy to guess and child’s play for experienced hackers.
- Use a mix of characters: Use uppercase and lowercase letters, numbers, and special symbols to craft a strong password that is near impossible to crack.
- Make your password lengthy: Your password shouldn’t be shorter than 15 characters.